On this page:

Introduction to the heating assessment tool

The heating assessment tool helps you calculate the minimum heating capacity required for heaters in your rental home under the healthy homes standards. As part of these standards, landlords must provide a fixed heater (or heaters) that can heat the main living room.

This tool is referenced in clause 10 of the Residential Tenancies (Healthy Homes Standards) Regulations 2019(external link) as the ‘heating capacity calculator’. The formula in the regulations is what the tool is based on (therefore the formula can be applied manually as an alternative to using the tool).

What the tool does

The tool provides a report that shows the minimum heating capacity you need for your main living room. You can use it to check if your current heating is sufficient to meet the required standard, or if you need to install a new heater(s). The report can also help prove a rental home meets the heating requirements in the healthy homes standards.

More information about the healthy homes standards 

The tool asks a series of questions about:

  • what region your home is in (to understand the local climate)
  • the type of property and when it received building consent
  • how much space you need to heat
  • what surfaces (walls, windows, doors, floors and ceilings) heat can escape through
  • how well these surfaces are insulated.

For rental home layouts that are complex to measure, it’s best to contact an industry professional like a home performance assessor to calculate the required heating capacity. The more accurate the information is, the more accurate the report will be.

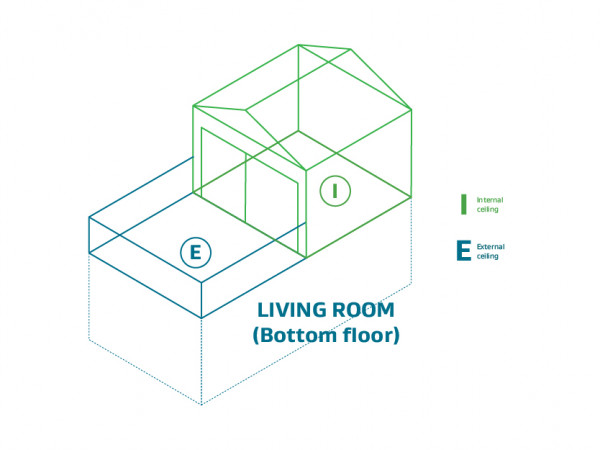
Using the tool for rooms with sloped /irregular ceilings

For living rooms with sloped / irregular ceilings the tool makes some conservative assumptions to help keep the required user inputs simple. This means the tool will usually generate a result that overestimates the heating requirements.

To calculate the area of the irregular part of the ceiling, the tool assumes a 45 degree angle. It will calculate the volume of the room based on multiplying the living room floor area with the highest wall height of the room. For example, for a rectangular living room floor plan, the volume calculation will assume a cuboid shape. The tool may also overestimate the area of any external walls with a sloped edge.

If you think the tool will not sufficiently take into account the design features of your property (e.g. if you have sloped roofs and/or irregular ceilings), we recommend you ask a professional to use the formula instead of the tool.  Alternatively you could engage a suitably qualified person to undertaking a heating assessment.

Using the formula instead of the tool

Using a qualified heating specialist

Results are rounded

The result from the tool is displayed in Kilowatts (kW) rounded up to one decimal place.

Disclaimer

If you use this tool in good faith by using accurate information, you can rely on the tool to deliver correct results based on that information. You’re also entitled to rely on the assumptions the tool makes, unless you know these assumptions are wrong.

Read our full disclaimer(external link)

Your privacy

When using the tool you’ll need to provide an email address if you want to save your progress and finish your assessment at a later time. We won’t store or share your email address. We’ll send a link to this address so you can access the tool and the information you’ve entered so far. This link will expire after 60 days and any information you’ve input will be cleared.

Read our full privacy statement

Industry professionals using the tool

For rental home layouts that are complex to measure, it’s best to contact an industry professional like a home performance assessor to calculate the required heating capacity. The more accurate the information is, the more accurate the report will be.

Industry professionals should note that for rooms with a sloped roof/irregular ceiling, the tool will assume that the slope is of a 45 degree angle. It will calculate the volume of the room assuming a cuboid shape, where the highest point of the slope is assumed to be the height. This will usually generate a result that overestimates the heating requirements.

In these types of cases where the tool may not fully take into account the particular details of the property, we recommend industry professionals use the formula instead.

Using the formula instead of the tool

The formula that industry experts can use for manual calculation can be found in schedule 2 of the Residential Tenancies (Healthy Homes Standards) Regulations 2019. This formula is the basis for the heating assessment tool.

Industry professionals should note that using an alternative tool or formula cannot guarantee that the calculation will be correct under the healthy homes heating standard. A different tool may underestimate the required heating capacity or input different values, and therefore may not achieve compliance with the standard.

Heating capacity formula(external link)

Find building practitioners in your area:

Search the licensed building practitioners register(external link)

Search the plumber, gasfitter and drainlayer public register(external link)

Search the electrical workers register(external link)

For more information or advice when installing heaters, woodburners or heat pumps, visit:

Community Energy Network (CEN)(external link)

New Zealand Home Heating Association(external link)

Master Plumbers (gasfitters)(external link)

Climate Control Companies Association of New Zealand (CCCANZ)(external link)

Home Performance Advisors (HPA)(external link)

How to use the tool and gather the information you’ll need

The heating assessment tool requires several pieces of information in order for it to provide accurate results. Following this guide will help you prepare the information you need before you start, so you can avoid pausing part-way through.

Overall you’ll need to:

  • gather information about the property type, age and location 
  • know when the home received building consent
  • measure the main living room and calculate areas
  • assess insulation and replace estimates where you can.


Steps to take before using the tool

1. Gather information about the property type, age and location

The council area that your rental home is located in helps the tool understand your local climate – for example, how cold it gets in winter. You need more heating capacity if you live somewhere cold. Some heat pumps struggle to perform at cold outdoor temperatures just above freezing point. If you live somewhere cold and your heaters include a heat pump, you’ll need one that performs well at cooler temperatures.

The date your home received building consent tells us what building standards apply. Your local council can help with this. They can provide a Land Information Memorandum (LIM) which includes information about your property.

The heating assessment tool will use this information to make an assumption about the insulation of your walls, windows, ceilings and floors.

If your home has been renovated throughout with wall, floor and ceiling insulation as well as double glazing, it may meet the healthy homes standards criteria to be treated as a ‘modern’ home by the tool.

In order to qualify, you will need to find out whether all of your insulation and glazing meets or exceeds the 2009 insulation and glazing standards.

Understanding if your home meets the 2009 insulation and glazing standard

For the purpose of calculating the heating capacity, apartments are defined as being part of a residential building of at least 3 storeys with 6 or more units.

If your rental property is defined as an apartment, the tool will reflect how these types of properties are better at retaining heat. 

Understanding whether your home meets the apartment criteria

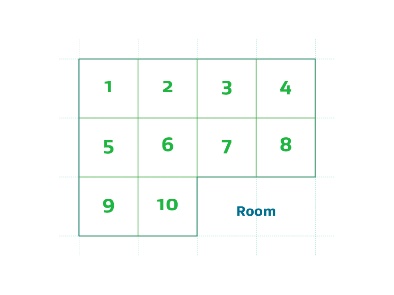
2. Measure the main living room and calculate areas

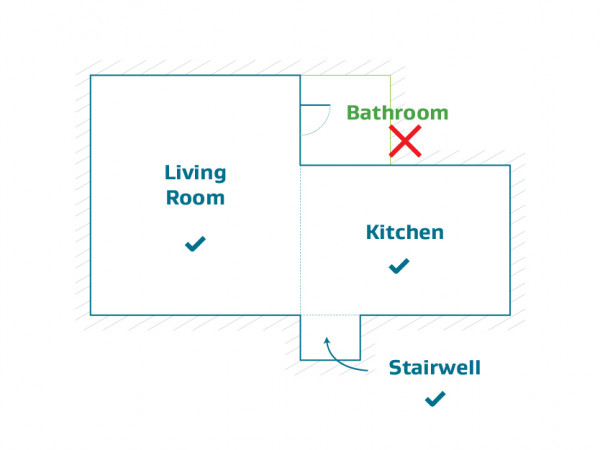
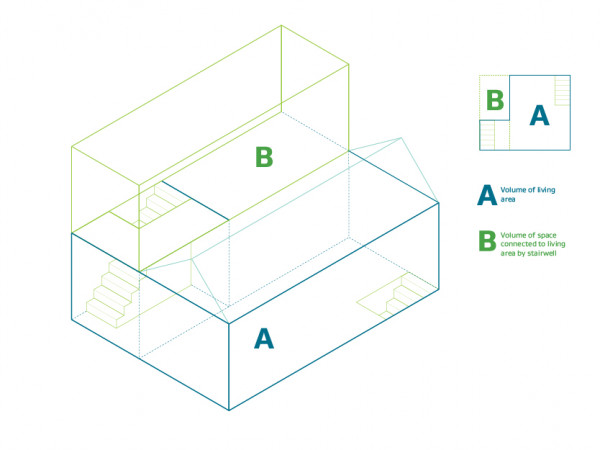
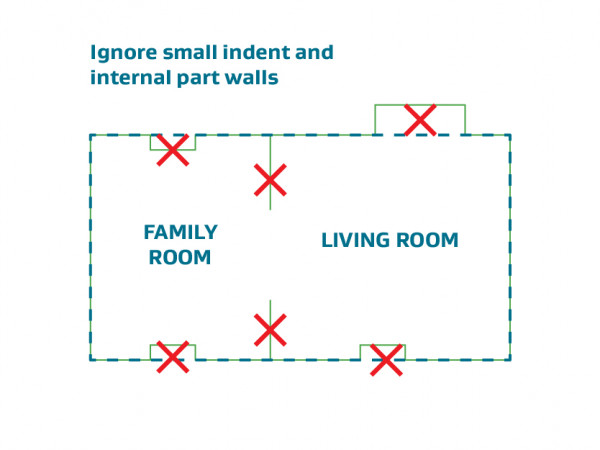
You’ll need to measure the main living room and any connected spaces that are always open to it, which cannot be closed off with windows or doors. Then you’ll need to calculate the areas of walls and floors. The tool will assume your ceiling area based on the size of the living room floor.

If you’re planning to renovate your rental property to make the main living room bigger, you should use measurements based on the future layout. This may overestimate the level of heating you currently need but will make sure your heating device will meet the healthy homes standards.

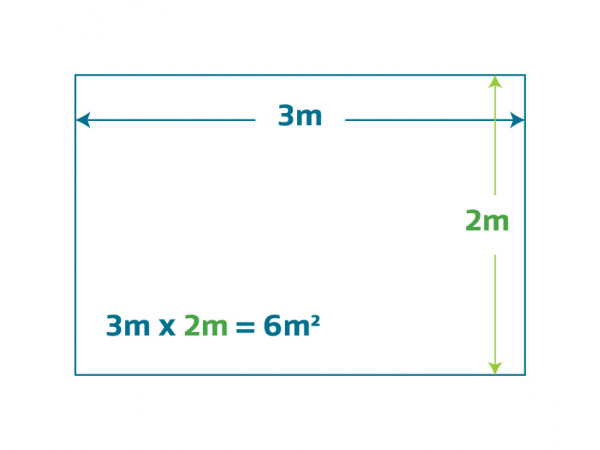
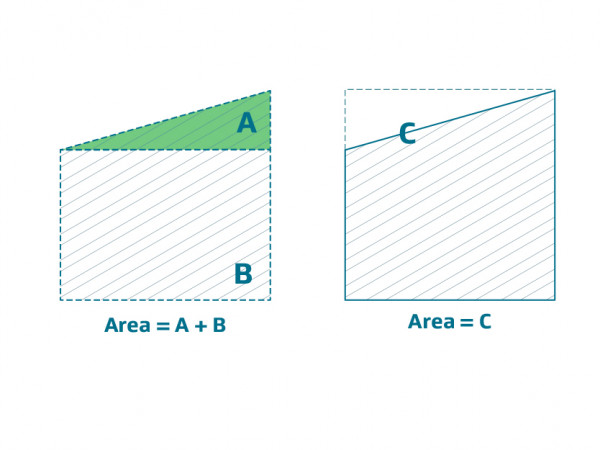
This section shows you what to measure and how to calculate the areas you need. These examples are written for floors. You can use the same calculations for walls or other surfaces.

Which room is the main living room?

The heating requirements of the healthy homes standards apply to the ‘main living room’ of a rental home. A living room can be any habitable space that can be used for general everyday living — for example, a lounge room, dining room, sitting room or family room. Living rooms can also include multi-use spaces like a studio apartment or open-plan kitchen/dining room. If you have more than one living room, use the largest living room.

What’s included in the living room?

In the tool, ‘living room’ means the whole space a living-room heater must be able to heat. You will need to include any other connected space that is always open to the living room, such as an open-plan kitchen, hallway or stairwell. Spaces are always open to each other if there is no solid barrier between them. If you can close a door or window, you don't need to include the space beyond it.

Living room includes any connected space such as kitchen, hallway or stairwell. If you can close the door you don't include it.

In the tool, ‘living room’ means the whole space a living-room heater must be able to heat. You will need to include any other connected space that is always open to the living room, such as an open-plan kitchen, hallway or stairwell. Spaces are always open to each other if there is no solid barrier between them. If you can close a door or window, you don't need to include the space beyond it.

Shows in 3D the volume that is the living room as A and the volume of the space connected living room as B.


How do I measure accurately?

When you measure lengths, ignore small details like skirting boards. You can also ignore small features (like pillars) that stick out from the wall, and any partial dividing walls.

Shows details in the room that can be ignored when measuring length for example pillars that stick out

Your measuring tape may show millimetres (mm), centimetres (cm) or metres (m). 1000mm = 100cm = 1m. You will need to enter your measurements in the tool in metres.

If you already have plans that show the measurements, you can use those measurements instead. If the plans use imperial measurements (feet and inches) you’ll need to convert them into metric measurements (metres).

How do I calculate the area of rectangles?

Measure the length of the room at its longest point, and the width of the room at its widest point. Length x width = area.

3m(length) x 2m (width) =6m

How do I calculate the area of other living room shapes?

Your living room may be a combination of rectangles, such as an L shape. You can break the shape down into several rectangles and add up their areas.

L shaped room can be measured as two rectangles

Or you can draw the shape on a grid and calculate the area by counting squares.


L shaped floor area as a grid. With 10 equal square shapes within the L shape.

Draw a grid or use gridded paper. Use each square to show 1m.

Measure the room and draw the wall lengths onto the grid. In the example you can see the measurements that are not whole metres cover part of a square.

Add up the squares the room covers. This gives you the area in square metres. If the room covers part of a square, you can calculate the exact area or count the whole square. Counting the whole square is easier but will overestimate the area.

 In this example, counting the whole squares gives you an area of 10m2. The actual area is closer to 9.5m2.


If you want to keep things simple, you can even replace the complex shape of your floor with a rectangle that fully encloses it. This will overestimate the area.

How do I calculate the area of complex shapes?

Your living room may include more complex shapes, such as curves or triangles. Break down the living room into shapes you can calculate the area for, and then add the areas up.Your living room may include more complex shapes, such as curves or triangles. Break down the living room into shapes you can calculate the area for, and then add the areas up.

Use these formulas or look up the formulas for other shapes.

  • Triangle: ½ x base x height = area. Measure the height of the triangle at right angles to the base. 
  • Circle: 3.1416 x radius x radius = area. The radius is the distance from the centre of the circle to the edge.
  • Part circle: circle area x proportion of full circle (eg ½ for a semicircle) = area

Example of a living room that is a rectangle shape and a triangle shape

If you prefer, you can draw the shape on a grid and estimate the area by counting squares.

How do I identify internal and external walls, floors and ceilings?

External walls, floors and ceilings are more important than internal ones for trapping heat. The tool will need you to specify whether walls, floors and ceilings are internal, external or a mix.

A wall, floor or ceiling is internal if it has another conditioned space behind, below or above it. A conditioned space is an area that’s designed to be heated or cooled, like a kitchen, hallway, bathroom or other room. This applies even if it is a different home or a neighbour’s apartment.

A wall, floor or ceiling is external if it does not have a conditioned space behind, below or above it. This could include property foundations, a garage, roof space, subfloor space or the outdoors.

If a wall, floor or ceiling is a mix of internal and external, you can call it all external or you can enter the details for each part separately. If you call it all external the tool may overestimate the level of heating you actually need. This ensures the heating capacity will be enough to meet the healthy homes standards. Separating the wall, floor or ceiling into internal and external parts will give you more accurate results.

Internal walls have internal space behind, above or below it

TEST


How do I measure windows, skylights and doors?

You only need to measure windows or other glazing in external walls or doors. You don’t need to measure windows or other glazing for internal walls, as the tool will treat them the same as the surrounding wall.

Measure the full size of windows and skylights, including frames. If several similar windows or panes are located together, you can treat them as one large window and give the combined size.

You don’t need to measure any doors, as we treat them the same as the surrounding wall. You need to measure any windows or other glazing in external doors.

3. Assess insulation and replace estimates where you can

Calculating a room’s heating needs is complex. The tool lets you simplify the calculations for areas, and its calculations for volumes make some assumptions based on this.

In some places the tool estimates a suitable value based on information you’ve provided. For example, it will assume your home has the minimum insulation building standards required but not more. You can use the estimate or you can provide a specific value to be more precise.

Where these estimates are not exact, the tool picks a safe value so you know the heating calculated by the tool will be enough. The tool might recommend more heating than you actually need. The more accurate the information is that you provide, the less the tool will overestimate the heating you need. If you know you have an R-value that is lower than the tool estimates you must enter the correct lower value.

What is an R-value?

An R-value is a measure of how well a building material traps heat. Based on the age of a home, the tool will estimate whether the walls, floors, and ceilings have insulation and how good it is (the R-value). The tool will assume that if any insulation is present that it’s in a reasonable condition.

The total R-value of a surface involves all its different layers. For example, if your wall’s layers are plasterboard, insulation and weatherboard, the R-value for each layer contributes to the total R-value. Even if your wall is not insulated, it will still have an R-value.

When should I enter my own R-value?

You can use the R-value estimated by the tool or you can enter your own R-value. For example, if your home has been upgraded with better insulation since it was built, entering the new R-value will provide a more accurate result.

The tool may estimate an R-value assuming that the property does not have insulation because of the year it was built. It’s usually easy to check under the house or in the roof space to see if insulation has been installed. All rental properties should have ceiling and underfloor insulation installed by 1 July 2019 where reasonably practicable. Some properties may not have been upgraded so the tool assumes insulation levels based on the year it was built.

How do I assess my insulation?

To assess the insulation at your property you can physically look, engage a professional to do an assessment, or check the council building file. If you're not sure of the location, type and condition of the insulation, seek advice from a professional insulation installer.

Assessing insulation

The tool will also assume that any insulation present is in a reasonable condition. If your insulation isn’t in reasonable condition you may need to upgrade it, to make sure it meets the healthy homes standards.

Healthy homes standards insulation requirements

If you’re checking insulation at a property it’s important to do this safely, particularly if there’s existing foil insulation. The installation or repair of foil insulation is banned in all residences including rental homes.

Checking insulation safely

Were there any changes to the default R-values in the tool when the changes came into effect (12 May 2022)?

The tool estimates a default R-value based on the information entered about the property.

As part of the review of the Heating Assessment Tool some of the default R-values for ceiling and underfloor insulation were reviewed and changed. You are still able to edit this R-value manually.

Changes to default R-values on 12 May 2022

Floor insulation:

Where a user actively selects ‘None of the floor’ in response to the question ‘How much of your floor has insulation that meets the required standard?’, the tool now assumes a new default floor R-value of 0.5.

This is because if the user is selecting ‘none’ then it is more likely the floor is uninsulated suspended floor than well insulated. This is because it is not uncommon for older floor insulation to rip (if foil) or fall off (if bulk insulation), making the insulation ineffective. If the subfloor is inaccessible then the landlord is exempt from upgrading the floor insulation, in which case the R0.5 for ‘None of the floor’ is appropriate.

If the floor is concrete the user should choose ‘All’.

Ceiling insulation:

Where a user actively selects ‘None of the ceiling’, in response to the question ‘How much of the ceiling has insulation that meets the required standard?’ the tool now assumes a new default ceiling R-value of 1.9.

This is because if the user is selecting ‘none’ then it is more likely the ceiling is below the healthy homes standard. If the user selects ‘none’ they are indicating this. R1.9 is still a reasonably good level of thermal performance, and there will be situations where the existing ceiling insulation has been more severely damaged over time (to a performance much lower than R1.9). However, usually such damage only occurs in accessible ceiling spaces where the landlord is obliged by the healthy homes standards to upgrade the ceiling insulation.

Rating form

Did you find this information helpful?

For general enquiries please contact us